


If you’re a seller on Amazon, you can withdraw your sales proceeds into the World Account, where you can hold your multi-currency funds, make currency conversions, withdraw to your bank account, pay suppliers abroad, or shop on 1688.com directly with your World Account balance.
You can collect your earnings from Amazon US, Amazon Europe, Amazon UK, Amazon Japan, and Amazon Australia. Due to Amazon’s anti-fraud policies, linking an account to Amazon requires more steps than other marketplaces. You’ll need to:
- Create a Receiving Account
- Add and verify a same-name payee to your WorldFirst Account
- Link your Receiving Account to Amazon and verify the account
- Withdraw your Amazon earnings into your own account
Please closely follow the step-by-step guide below to complete the linking process.
| Step 1 – Set up your WorldFirst Receiving Account
First, you need to set up a Receiving Account in the currency of your Amazon marketplace.
- On your World Account dashboard, go to the “Collection” tab
- Then click on “Manage Accounts” > “Add a New Receiving Account”. You can then select the currency of your marketplace
Amazon may ask for further documentation as part of their seller verification process. You can use your Account Verification Letter for this. To generate an Account Verification Letter, simply click on “Download proof of account” below your account details. Your letter will be generated on the next page.
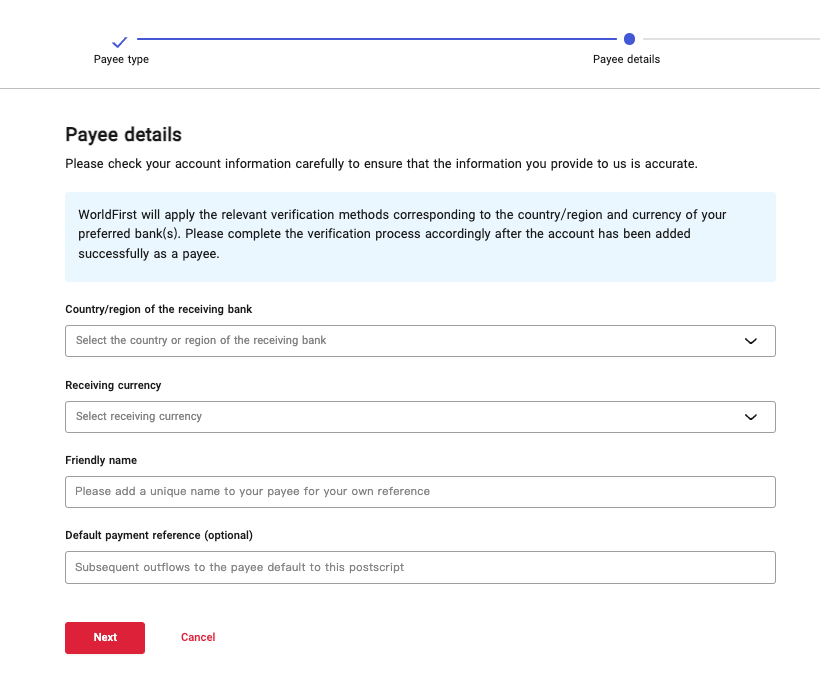
| Step 2 – Add a same-name payee
To reduce fraudulent activities, Amazon has specified that all merchants must have a bank account held in their name. Amazon will stop the disbursement of your funds unless a bank account held in your name is added to your World Account.
- To add your account, go to “Payees” and click on “Add a new payee”
- Click on “Add” under Single Payee
- Choose “Your own account” and select the account type you want to link to: “Personal account” or “Business account”
- Click on “Next”
- Fill out the payee details by following the prompts and click on “Next” once completed
- After you’ve added the payee, you might be prompted to do a penny test or upload additional documents to prove that the account is yours
- You’ll see a notification under the “Payees” tab under Payee Management if you’re required to perform additional verifications
- Once the account appears on your “Payee Management” page and the “Action” is shown as “Pay”, your account has been successfully added
For detailed steps to verify the payee, please refer to the below guides:
You can also upload your bank statement, AVL, or bank reference letter to verify.
- Click on “Upload verification file”. Upload one of the documents listed in the drop-down menu
- Click on “Submit” to submit the document for review. We’ll inform you of the results
| Step 3 – Add World Account as a deposit method on Amazon
Once you’ve successfully added your same-name payee, you can link your Receiving Account to Amazon.
On Amazon Seller Central:
Your bank account also needs to be verified on Amazon before you start receiving deposits. You can follow the below steps to initiate a verification. Amazon will notify you of the results within 48 to 72 hours.
- On the “Deposit Methods” page, click on “Manage Deposit Methods” and find the bank account that you’re using to receive disbursements
- On the “Verify Bank Account” page, select “Bank Account Holder Name”
- Click on “Upload Bank Statement” to upload your bank document. Here, you can usually upload the account verification letter of the Receiving Account. Please read Part 1 of this guide on downloading the letter
- Confirm the requirements for verification, and then click on “Submit for Verification”. You’ll be redirected to the “Manage Deposit Method” page, where the verification status of your bank account will display “In progress”
Once the verification is complete, you’ll be able to receive earnings from Amazon with the World Account.
| Step 4 – Withdraw your World Account balance into your bank account
- On your World Account dashboard, go to “Payments” > “Send & withdraw”
- Select “Single payee”, select “Bank account”, and then select the same-name account that you’ve added
- On the next page, enter the balance that you’d like to withdraw
Once you’ve completed SMS or Authy authorisation, you’ll be able to confirm the transfer and withdraw your World Account balance into your bank account.